Instructions - Videos - FAQ
Instructions for Gryphon Products
View or download instructions. If you have an older product that is not listed, contact us and we can provide the instructions.
* Diamond Band Saw Model: 300, 350, C, C-40
* Diamond Wire Saw Model: Omni-1, Omni-2, Omni-2+
* Diamond Ring Saw Model: Zephyr
* Diamond Grinder Model: Gryphette, Studio, Twister, Convertible, Wet Belt Sander
* Abrasive Miter Saw
* Lapidary: 10-In-1 Workshop, Diamond Gem Lathe, Micro Wire Saw
Videos
The following are links to various informative videos posted on YouTube. Some Videos were produced by Gryphon, and others were produced by customers.
FAQ (Frequently Asked Questions)
Scroll down to view common questions for various products
1. How do I choose the saw that is right for me?
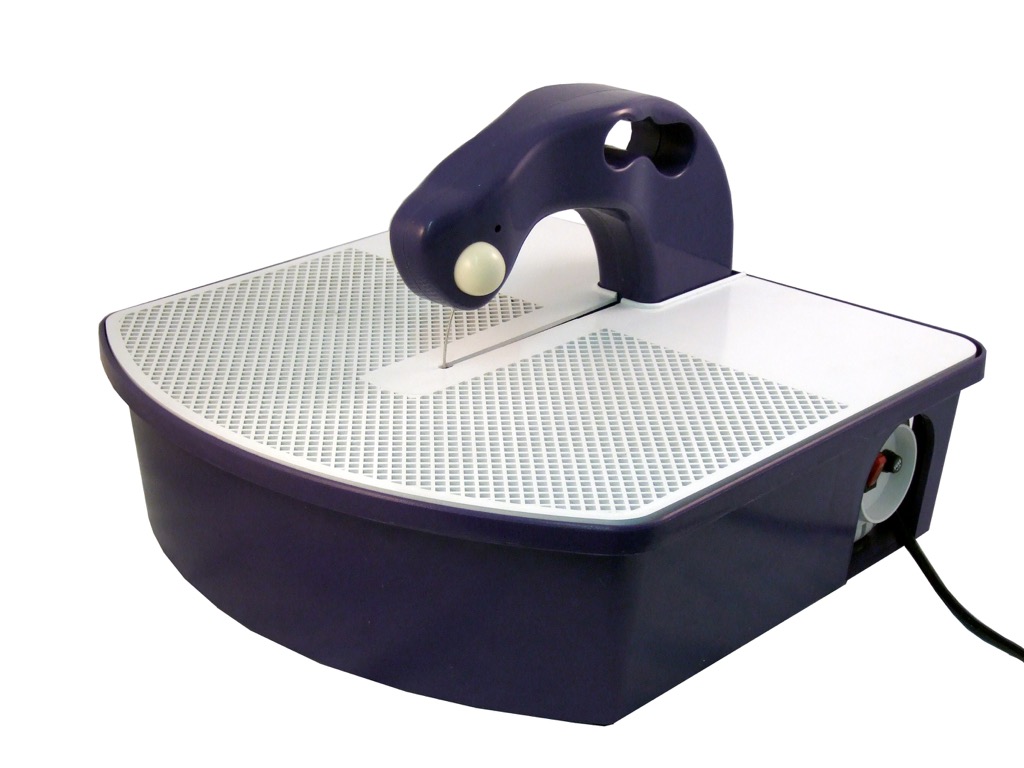
The Zephyr Ring Saw is smooth and quiet and cuts in any direction. Many people prefer the ability to cut in any direction, as they find it intuitive and useful. The main section of the saw can be removed from the base to allow the saw to be used hand-held. The Zephyr has a larger throat than the other saws in its class, which can be useful for some jobs.
Follow this link for an overview that describes the differences between the various types of diamond saws.
2. I'm having trouble putting the work surface on. What's the secret?
The work surface is designed to fit tightly so that it will not rattle. The surface is easy to install once you know the technique. To install the work surface, put it in place starting with the left rear corner. Fit the left rear corner into the slot running around the base. Next, take your right thumb and push the right side of the platform towards the center of the saw and down. You will hear it snap into place.
3. What is the best way to mark the pattern before I cut?
As you undoubtedly have or will discover, the glass gets wet when you use a diamond saw. For this reason regular markers, such as Sharpies, quickly wash away. There are markers available that use paint rather than ink, and these are well suited for marking patterns on glass. The most popular of these seems to be the Pilot Extra Fine Gold and Silver Creative Marker. We have found these at our local Staples, and Office Depot has something similar. You can also copy your pattern onto overhead transparency material and glue or tape the pattern to the glass. Your stained glass dealer can probably recommend some commercial products that can be applied over a regular felt marker lines to improve their resistance to water. In a pinch, you can use Chap Stick or Vaseline.
4. Should I be taking any precautions when I don't plan to use the saw for awhile?
We recommend that after using the saw you empty the base, add some clean water, and run it for a few seconds. This will help to rinse out the glass dust that was in the dirty water and has accumulated on the inner workings. Emptying the base of the new water is a good idea if the saw will be sitting for a while, as the lowest pulley inside the saw would otherwise be sitting in water.
5. How do you change the blade?
Our store has a quick video in each of the blade descriptions that will illustrate how to change the blade. Click here to see the video.
6. What is a Separating Blade?
A Separating Blade allows you to make inside cuts without a lead-in. Watch this video for a short demonstration of using the Separating Blade.
6. What sort of preventive maintenance should I be doing?
You should open the covers and inspect the working parts on a regular basis. Clean out any sediment that has accumulated, rinse the inside with fresh water, and inspect the rubber wheel inserts for wear. When you notice that the rubber has worn enough so that it doesn't hold the blade from moving from side to side, you should replace them. Follow this link for more information on wheel maintenance. The residue from some of the materials that you will cut is much more abrasive than others, and after a few inspections you will have a good idea of how often to inspect and clean your saw. You can often extend the life of the blade when cutting speed diminishes by cutting a small section of a dressing stone, or alternately any hard gemstone or garden stone. This will help flush the softer material from the blade and sharpen the diamonds. Also, this is a good technique for removing burrs from the blade if you find that you are getting chipping in your glass.
7. How do I prevent small pieces of glass from falling through the blade hole in the worksurface?
If you are trimming your piece and having trouble with the very small scrap falling through the worksurface, you can cut a small square piece of tape, such as electical tape, to cover the hole. Cut a slit from the middle of one side to the center of the square so that you can install the tape around the blade. If you prefer, you can buy ready cut tape.
8. What size fuse is used in the Zephyr?
The Zephyr uses a standard fuse (sometimes called a mini fuse because of the size). It is 3 amps, fast acting.
1. How do I choose the saw that is right for me?
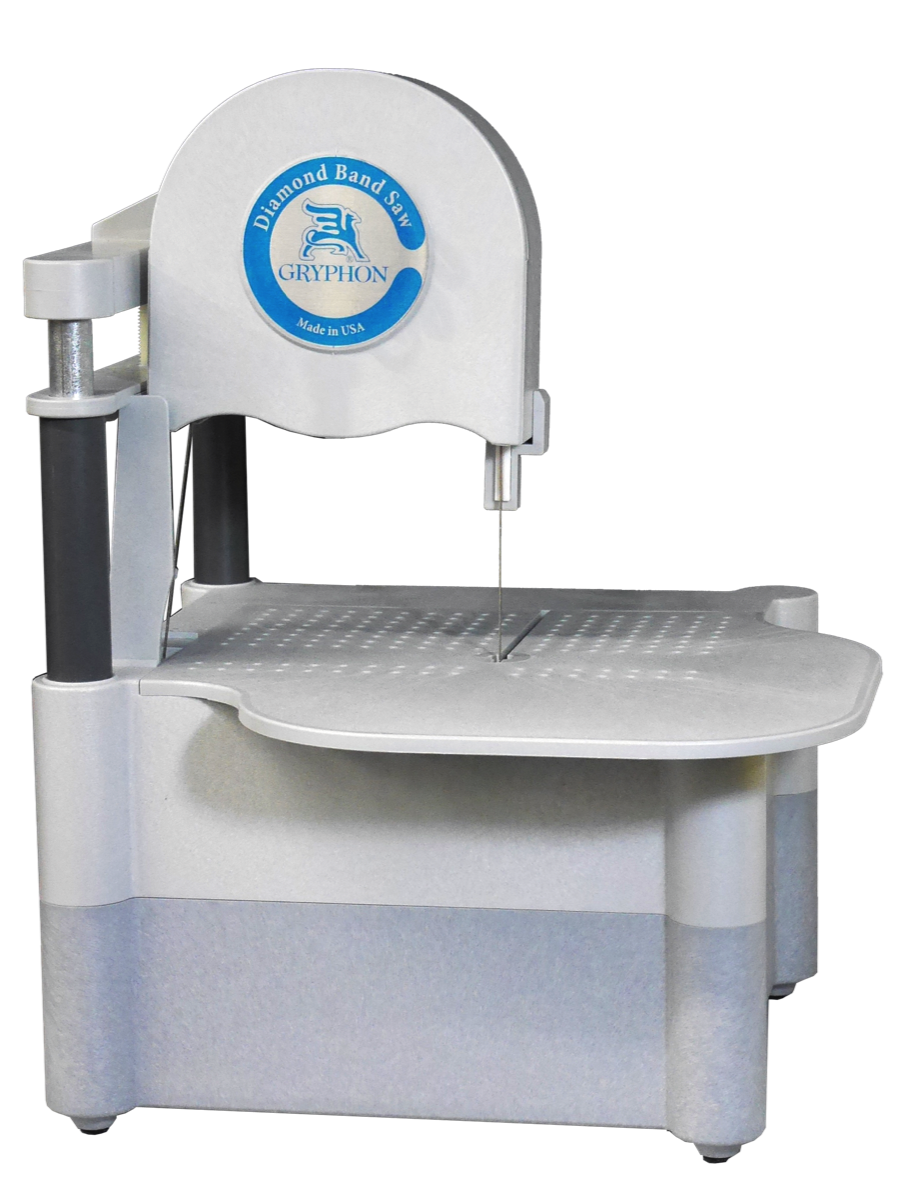
The C-40 Band Saw is very fast, quiet and reliable. It removes a thin line of material as it cuts, and is the best suited saw for lapidary work and for cutting thick slabs of glass. It is designed for cutting intricate patterns in hard material, and is used often in industry for cutting exotic materials.
Follow this link for an overview that describes the differences between the various types of diamond saws.
2. Where can I buy replacement sponges for the band saw?The saw was designed to use standard kitchen sponges, such as you see at your local grocery store. These sponges are typically about 3" x 5" by 1/2", although other sizes will work. We cut each sponge into thirds, and therefore each pack of four kitchen sponges yields twelve sponge strips for the band saw.
3. What is the best way to mark the pattern before I cut?
As you have/will undoubtedly discover, the glass gets wet when you use a diamond saw. For this reason regular markers, such as Sharpies, quickly wash away. There are markers available that use paint rather than ink, and these are well suited for marking patterns on glass. The most popular of these seems to be the Pilot Extra Fine Gold and Silver Creative Marker. We have found these at our local Staples, and Office Depot has something similar. A less effective technique is to use a regular marker and cover the line with something water resistant such as Chap Stick. You can also copy your pattern onto overhead transparency material and glue or tape the pattern to the glass.
4. How do I tell when it is time to replace the bushings or the wheel bands?
Typically, the wheels, bushings and wheel bands will last several years before needing replacement, but when the time comes, they are easy to replace. All operations require removal of the effected wheel. To remove a wheel, loosen the set screw in the collar in front of the wheel. If it is stuck due to an accumulation of glass dust, put a drop of Liquid Wrench into the set screw hole and allow it to penetrate for a few minutes. In particular stubborn cases, after removing the screw, you may also have to put a couple of drops into the hole in order to loosen the collar on the shaft. There is no harm in using a wrench such as a Channel Lock to rock the collar back and forth in order to break it free of the glass dust. Be careful not to use so much force that you bend the steel shaft. You should be able to pull the wheel off of the shaft at this point. If you have trouble grabbing the upper wheel to pull it forward, you can gently pry it forward using a two-pronged barbecue fork.
5. Can I cut a straight line with the Band saw?
Because of the flexible nature of the blade, cutting a straight line is tricky, but it can be done. First, take your time and focus on the path that the blade is taking. You will need to make small adjustments to the position and angle of the work as you are cutting to counter the flexibility of the blade. As the blade starts cutting to the right of your line, you should push the work to the left, and visa-versa. This will cause the blade to straighten. It may seem counter-intuitive at first, but after a little practice, it will seem second nature and you will be making straight cuts without thinking about it.
6. What sort of preventive maintenance should I be doing?
You should remove the platform and inspect the water reservoir on a regular basis. Clean out any sediment that has accumulated, rinse the inside with fresh water. The residue from some of the materials that you will cut is much more abrasive than others, and after a few inspections you will have a good idea of how often to inspect and clean your saw. You can often extend the life of the blade when cutting speed diminishes by cutting a small section of brick or rock. This will help flush the softer material from the blade and sharpen the diamonds. It is a good idea to remove the blade if the saw is not going to be used for a period of time.
7. Just watched the video on the C-40 band saw. Interested in using this saw in classes. I understood the video to show that the blade would not cut through skin when the saw was operating. My fellow artist friend said no, the video meant it would not cut through skin when it was in the off position. Help me out here....will this blade cut through skin when it is in the ON POSITION and is cutting glass?
The blade has small diamond particles on it. There are no teeth, so it is not like a regular band saw blade. Think of it like the difference between taking a toothed saw blade or a file to your skin. The toothed saw blade would cut the skin immediately, and the file would have no effect (it eventually might cause a blister if you rubbed it long enough). If you touched the C-40 blade while it was running, you might be startled, but that would be the worst result. It would cut through your finger nail, however.
8. What is the easiest way to remove an old Lower Wheel Collar?
A collar that has been installed for years may be difficult to remove due to having been in a wet environment for so long. We have found that this is the easiest way to remove the collar. First, drip some Liquid Wrench onto the set screw and the wheel's shaft. Let it sit for several minutes, and then remove the set screw completely. Drip some additional Liquid Wrench into the hole in the collar where the set screw was installed. Let the Liquid Wrench work for a few more minutes, then use a pair of pliers, such as Channel Locks, and slowly but firmly rotate the collar on the shaft. It should break loose and be easy to remove after this. Clean the shaft with steel wool (not Emory cloth or sandpaper), and lubricate with a good grease or petroleum jelly before installing the new wheel.
9. What is the easiest way to remove an old Upper Wheel?
The Upper Wheel Collar is seldom stuck to the shaft as can be the case with the Lower Wheel Collar, but the wheel itself can be difficult to remove due the fact that it is difficult to grab the wheel to pull it off of the shaft. The easiest way that we have found to to gently pry the wheel forward on the shaft by carefully applying equal pressure to the wheel on both sides of the shaft simultaneously. This is most easily accomplished by using a tool like a two-pronged barbecue fork. This will prevent the possibility of bending the motor shaft as you pry.
10. Can I use the C-40 Band Saw to cut bottles?
All models of the C-40 can cut bottles and many customers are using the saws for this purpose. The C-40 Tall is the best choice for cutting bottles because it has enough clearance for even large wine bottles.
Start by marking the line that you wish to cut with a Sharpy or a paint pen in a color that will give good contrast to the glass. A piece of masking tape can make a good background for the Sharpy. If you take your time and let the blade do all the work, you will be able to make straight cuts through the bottle.
The edge of your cut in the bottle will be a little rough, but you can polish the edge to a beautiful smooth finish using our Wet Belt Sander. Start with a medium grit such as 120 to get rid of the major grooves in the glass, progress to the 400 grit, and finish with our cork belt to get a highly polished edge.
11. How do I adjust the tension of the blade
We have prepared a video that illustrates the procedure for adjusting the blade tension. You can find it here.
1. When would I use a cork belt?
The cork belt is used for very fine polishing, and is the modern replacement for the old felt belt (which had to be used with a polishing compound). When used on glass, you will be able to achieve a finish that is as smooth as fire polishing in your kiln. The cork belt is a wonderful time saver and eliminates the risk of re-firing a piece just to polish the edges. You would first smooth the edges of your work using courser belts, such as the 120 and 400. Before switching to the cork belt, your edges should be free of scratches and gouges. They should have a frosty appearance with only the fine scratches left by the 400 belt visible. The cork belt cannot remove deeper scratches, so your prep is important. You will find that this process is fast, and the results are impressive.
2. What size fuse is used in the Wet Belt Sander?
The Wet Belt Sander uses a standard fuse (some times called a mini fuse because of the size). It is 3 amps, fast acting.