Set Up
Your Gryphon Lapidary Workshop is shipped ready to use after a few simple steps.
1. Remove the two Allen screws holding the coolant support bar and reverse the bar so that the large hole is at the top. Insert the copper coolant supply tubing through the coolant supply bar with the valve forward of the bar. Use a small length of the smaller tubing to keep the tubing from slipping too far through. Tighten the cap screw just enough so the assembly can be easily rotated aside when inserting discs.
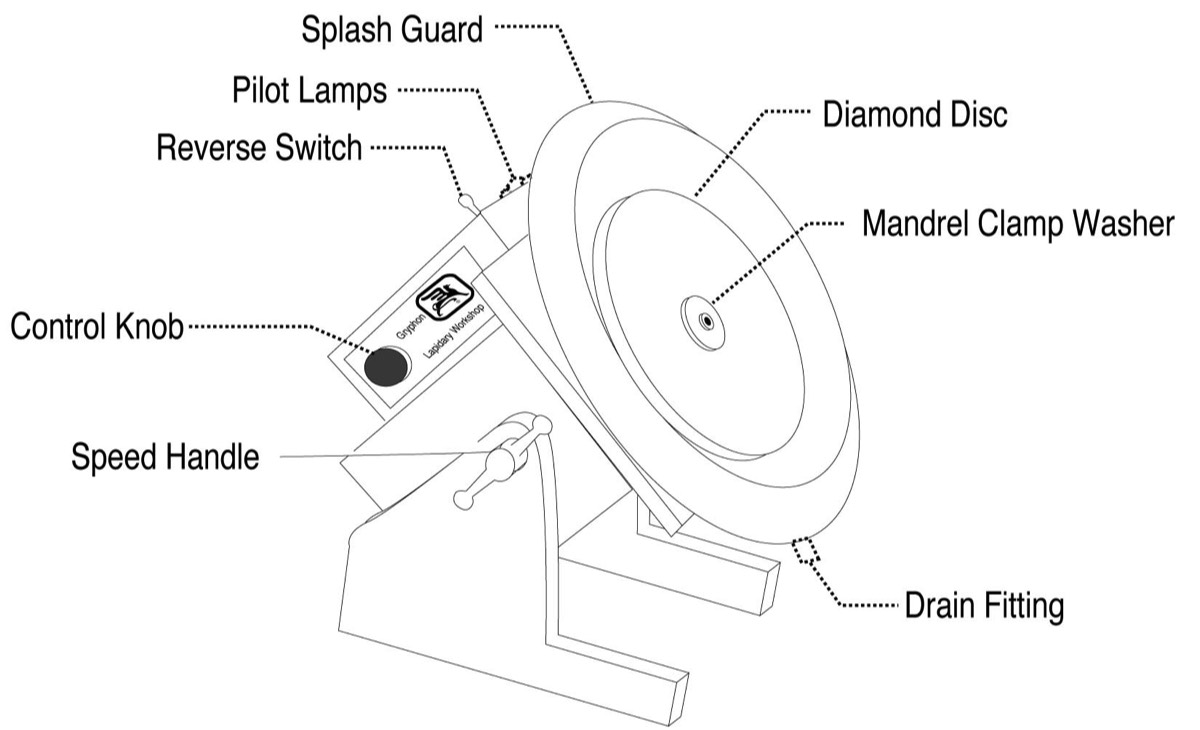
2. Mount the four guard posts, using the screws provided, in the four holes in the guard. Back off the four thumb screws in the square motor plate until the holes are clear. Orient the the splash guard drain fitting at the bottom, and insert the posts into the matching holes. (Spring the posts lightly, if required, until they line up.)
Work Safety
Safety glasses should always be worn as a protection against rock fragments.This machine is specifically designed for use with metal bond diamond tools, and diamond charged sanding and polishing discs. Never use mineral composition grinding wheels of any type as they can break up and pose a safety hazard.Use a three wire grounded outlet only.Reverse the Spindle direction only when it is stopped.Keep your machine and tools clean when not in use.
Coolant System
The coolant system consists of a pump, a supply container and a settling tank. The two containers are supplied as part of the Lapidary Workshop, but are not part of the Glass Workshop, as two large buckets are recommended for this application.
The unit is supplied with two lengths of tubing. The smaller diameter tubing has a brass nipple at one end which is screwed into the matching fitting on the pump. The other end of this tubing fits onto the copper coolant supply tubing mounted previously.
Place the pump in one end of the coolant supply container. (Use a large bucket in the case of the Glass Workshop.) Place the coolant settling tank in the opposite end of the coolant supply container. (Use a second large bucket for coolant recovery in the case of the Glass Workshop). Slip one end of the large diameter tubing over the splash guard drain fitting. The other end of this tubing is to be inserted through the retaining clip in the settling tank. (Or into the second large bucket). The tubing is supplied in a length sufficient to position the coolant containers on the floor under the work bench on which the Workshop will be placed. The drain tubing should be cut , if required, so that it’s path is reasonably straight.
Add water so both tanks are full to just below the two overflow holes in the settling tank. In the case where two separate buckets are being used, fill the supply bucket as full as practical, and insure that the pump is always under water during operation.
Plug the pump into the convenience outlet on the side of the workshop so that the pump operation may be controlled by the switch adjacent to the outlet. Regulate the water flow by adjusting the valve on the copper tubing. Never pinch or crimp the copper tubing as the pump is not a pressure type pump and requires the full opening.
When working, occasionally check the water level to be certain that the pump is fully submerged. Whenever you are through using the coolant system, be certain that the switch is turned off.
All components can be readily removed for cleaning and the plastic tubes can be cleaned by using a length of wire to pull a small wet cloth through them. Do not put any grinding waste into your plumbing as it will quickly clog it.
Note: When changing from Metal Bond Diamond grinding discs to Resin Bond Polishing discs, clean the system thoroughly to prevent contamination.
Check Out
Connect the power cord to a three wire grounded outlet 110-120 Volt AC, 60 Hz.
Turn the Control Knob clockwise until the mandrel turns. It should rotate counter-clockwise for normal applications; if not, flip the reverse switch. Always let the motor stop before changing direction of rotation. Operate the knob through the full speed range and check the adaptor for smooth, true running. The pilot lamp nearest the control will indicate the motor “on” condition. The second lamp indicates power to the convenience outlet.
Electronic Speed Control
Turning the Control Knob clockwise first turns the motor on and then serves to increase the speed. A calibration chart is supplied with each machine and documents the mandrel speed at various control knob positions.
Reverse Switch
For most use the spindle should rotate counter clockwise. This serves to keep the tools secure, as a right hand thread is used. A reverse switch is provided to change direction when needed for certain applications. The motor performs equally well in either direction.
Mandrel Adaptor Assembly
This three piece unit is machined of stainless steel with a high degree of precision. The lower (coupling) portion is secured directly on the motor shaft. A rubber grit slinger keeps the dirt out of the motor bearings and should always be in place against the motor plate. The center portion is a support flange that fits into the coupling and is held by two set screws. It has a 1/2” diameter boss to accurately align the discs and is tapped 1/4-20 for spin-on tools. A husky clamp washer and cap screw complete the unit.
The coupling portion by itself permits you to use 1/2” shaft mounted tools as well as some special items of our design or adaptation.
The coupling has a hole in it just above the grit slinger. By inserting a wrench into this hole you can prevent the shaft from turning while removing spin-on tools. Caution: Always clean the support flange or other tools before inserting them into the coupling.
Electrical Information
Grounding: It is important for safety that a three wire electrical ground be maintained. If your outlets are the two contact type, purchase and use a suitable three wire adaptor which will maintain the chassis ground incorporated into the unit.
Fuses: The motor fuse is rated at 5 amperes and should never blow under normal use, as the working amperage of the Workshop is under two amps. If replacement is ever required, do not exceed 5 amps as this fuse provides protection for the control unit.
The convenience outlet is also provided with a 5 ampere fuse, and this is adequate for all expected uses. If you have a requirement for added power, this fuse can be safely replaced with a fuse of up to 10 amperes maximum as it is completely isolated from the motor control circuit.
Using Metal Bond Diamond Discs
Metal Bond Diamond Discs are the basic tools your Lapidary Workshop was designed to use. Take care of them, and they will give you years of service.
Before mounting a disc be certain that the mandrel pieces and the disc are clean. Dirt can prevent the disc from seating properly and it may not run true. Make sure the disc is fully down on the support flange, then secure it with the clamp washer and cap screw. There is no need to over tighten the screw as the correct spindle rotation (counter clockwise) tends to keep it tight. Set the speed at about 1000 RPM. Direct your coolant near the center of the disc just clear of the clamp washer. This allows centrifugal force to distribute the water over the full working surface. Use a moderate flow only (the point at which the flow changes to drips is just about right).
By means of the four thumb screws, adjust the height of the splash guard. It should be just high enough to contain the coolant for general use. Loosen both speed handles and adjust the machine to the most comfortable angle, then secure.
Following the use of your fine metal bond disc, you will change to your finer sanding and polishing discs. We have found that 5 different units (180, 600, 3,000, 14,000, and 50,000 used in that sequence) will handle just about every polishing need.
The Gryphon Gem Polishing Speed Cones form an excellent and very convenient system for polishing your work. The specially designed Neoprene cones provide an ideal shape for polishing both flat and curved pieces, and are easily charged with diamond compound.
Helpful Suggestions
Keep all adaptors clean so your tools run true and flat.
Keep your Workshop clean. Wipe it with a damp cloth or sponge. Remove the splash guard and clean around the motor shaft and the motor plate. Use a brush and water to clean the splash guard. Caution: Do not put any grinding waste into your plumbing as it will quickly clog it. Clean the splash guard and coolant tanks outside.
Never hammer on the adaptor or motor shaft. A bent shaft can result. When removing a wheel, rock it slightly if needed to loosen it. Cleaning the shaft and adaptor before each installation can prevent foreign material from making disassembly difficult.
Insure that the coolant drains properly from the Splash Guard. Never allow coolant to enter the motor housing through the spindle hole.
Other than cleaning, there is no maintenance needed for many years of service. The workshop is ruggedly built and designed for years of service with reasonable care. As with any such precision product, considerate handling will keep it that way.